Part 2: Organising Your Digital Workspace with Homepage
Bringing Order to Your Digital Workspace
Introduction
While keeping a physical workspace tidy is essential for focus and productivity, the same principles apply to our digital environments. Over time, I realised that having multiple browser tabs open, scattered bookmarks, and disorganised files slowed me down just as much as a cluttered desk. To streamline my workflow, I explored Homepage, a self-hosted dashboard that centralises access to all essential work resources.
Why Use a Self-Hosted Dashboard?
If you frequently juggle multiple tools, platforms, and websites, a dashboard can significantly improve efficiency. Instead of rummaging through bookmarks or typing URLs manually, everything is accessible in one place. Here’s how Homepage helped me bring order to my digital workspace:
“What’s this ‘Homepage’ you speak of?”
- It’s a lightweight, highly customisable dashboard that acts as a central hub for quick access to applications, services, and web links.
Let’s dive into it*..*
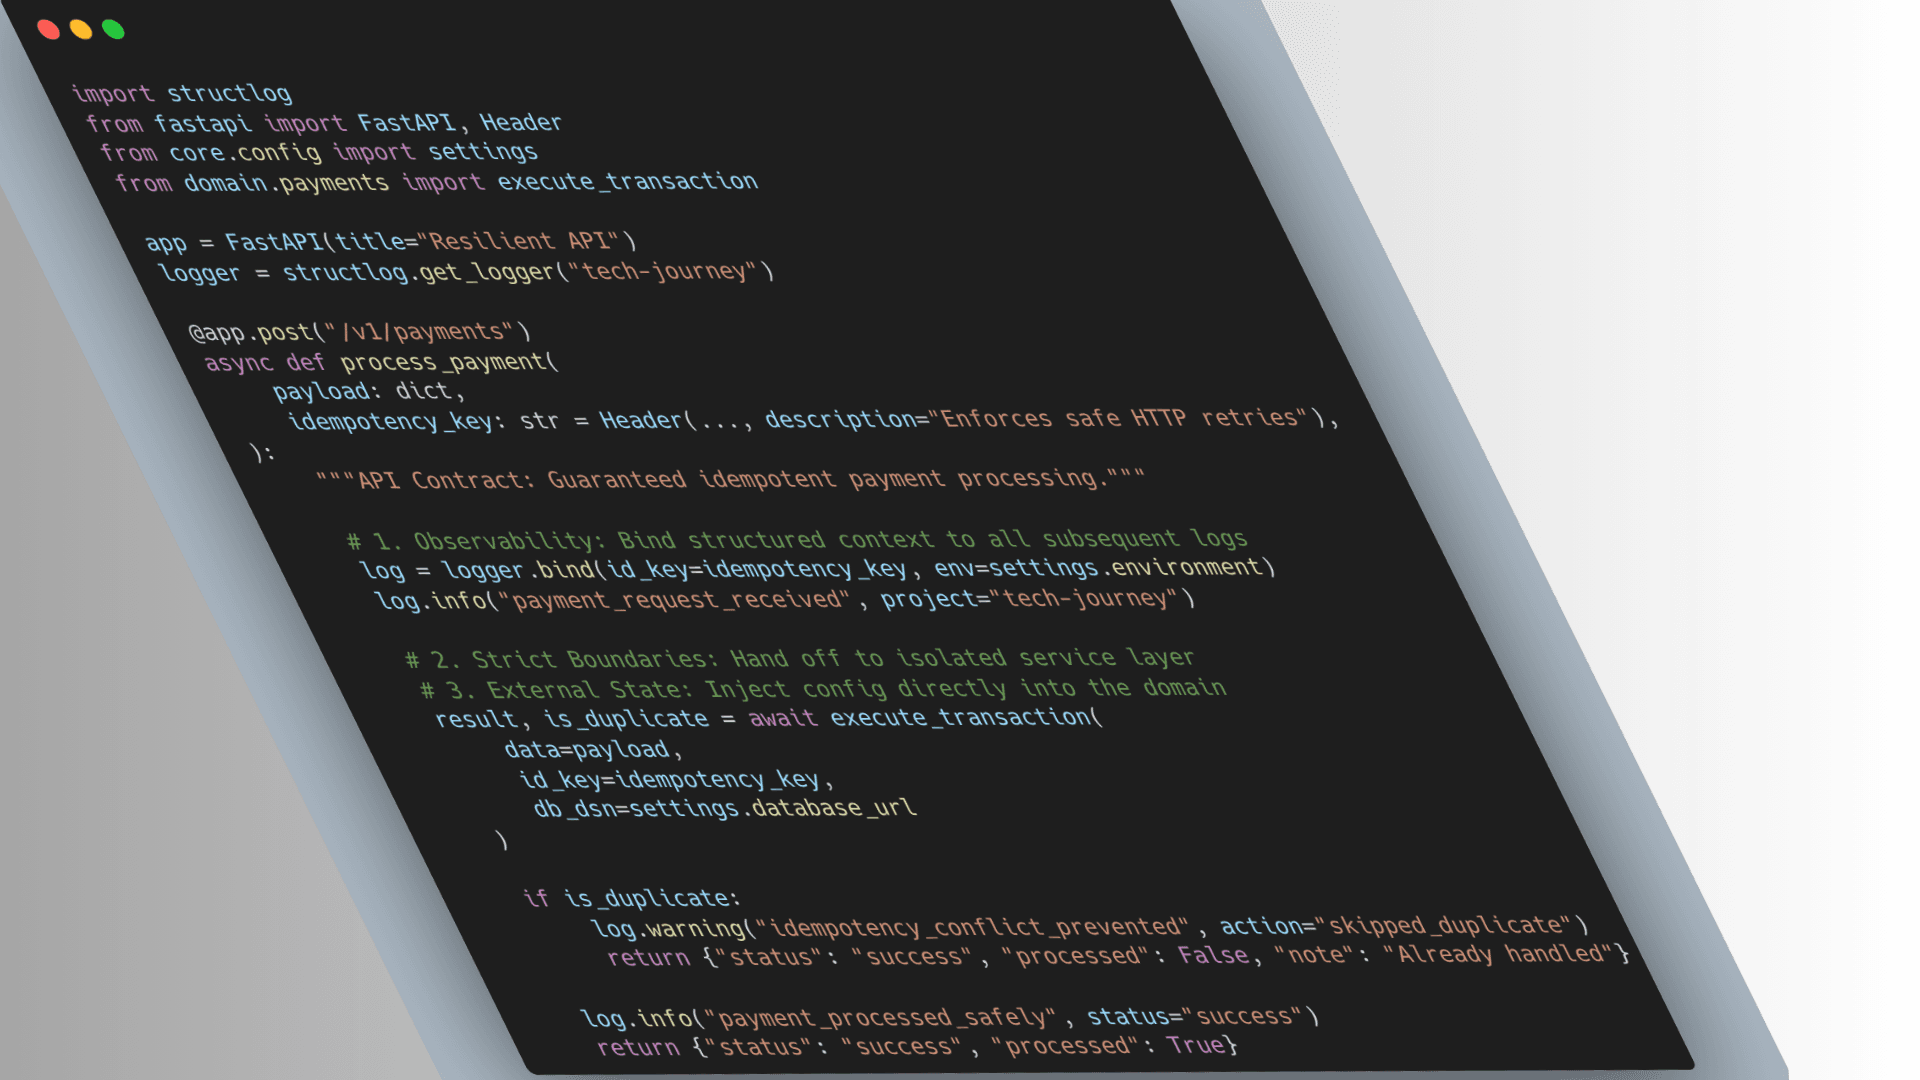
1. Deploying with Docker
Since I run most of my self-hosted services in Docker, setting up Homepage is pretty straightforward.
Here’s how you can deploy it:
# create a directory called homepage and cd into it.
mkdir -p ~/dashboard/homepage && cd ~/dashboard/homepage
#create a docker-compose.yml file
nano docker-compose.yml
Paste the following configuration(be sure to read the comments):
---
services:
  homepage:
    image: ghcr.io/gethomepage/homepage:v0.9.2
    container_name: homepage
    ports:
      - 3000:3000
    env_file: .env # Make sure to create this .env file in your current working directory (use touch .env)
    volumes:
      - ./config:/app/config # Homepage will create this for you.
      - /var/run/docker.sock:/var/run/docker.sock # (optional) For docker integrations, see alternative methods
    environment:
      PUID: $PUID # Set this to your user ID (you can find it by running `id -u`)
      PGID: $PGID # Set this to your group ID (you can find it by running `id -g`)
      TZ: Africa/Johannesburg # set to your own timezone
    restart: unless-stopped
2. Accessing the default dashboard
Once deployed, you can access the dashboard via [http://<your-server-ip>:3000]
Homepage has a user-friendly YAML-based configuration file, making it easy to customise layouts, themes, categories and all sorts*.*
Note: The icons we will be using are sourced from Homarr Labs Dashboard Icons, where you can explore a wide variety of icons to further personalise your dashboard.
Your default dashboard should look like this:

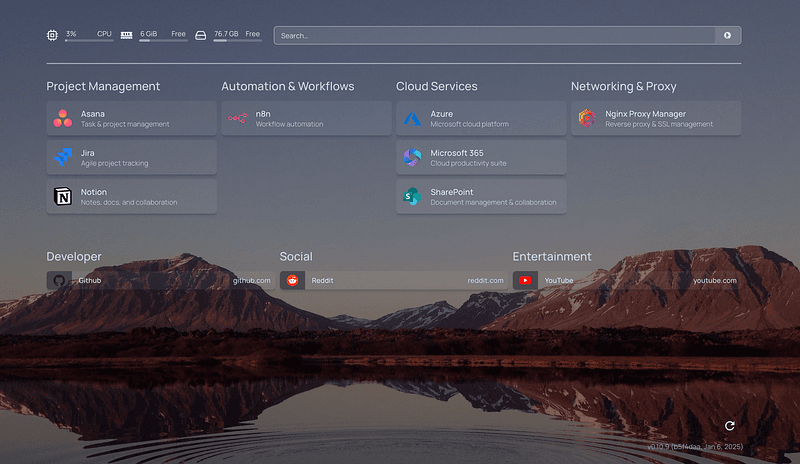
3. Updating the services.yaml File
Now let’s customise the dashboard with your own services.
Step 1: Locate the services.yaml file in the config directory:
cd ~/dashboard/homepage/config && nano services.yaml
Step 2: Add Your Services
Now, you can copy and paste the following configuration into the services.yaml file. The example config below will organise your dashboard with categories for project management, automation, cloud services, and networking but feel free to customise it according to your needs:
services:
  - Project Management:
      - Asana:
          icon: https://cdn.jsdelivr.net/gh/homarr-labs/dashboard-icons/png/asana.png
          href: http://app.asana.com
          description: Task & project management
      - Jira:
          icon: https://cdn.jsdelivr.net/gh/walkxcode/dashboard-icons/png/jira.png
          href: http://your-jira-link-here
          description: Agile project tracking
      - Notion:
          icon: https://cdn.jsdelivr.net/gh/walkxcode/dashboard-icons/png/notion.png
          href: http://your-notion-link-here
          description: Notes, docs, and collaboration

  - Automation & Workflows:
      - n8n:
          icon: https://cdn.jsdelivr.net/gh/walkxcode/dashboard-icons/png/n8n.png
          href: http://your-n8n-link-here
          description: Workflow automation

  - Cloud Services:
      - Azure:
          icon: https://cdn.jsdelivr.net/gh/walkxcode/dashboard-icons/png/azure.png
          href: http://portal.azure.com
          description: Microsoft cloud platform
      - Microsoft 365:
          icon: https://cdn.jsdelivr.net/gh/homarr-labs/dashboard-icons/png/microsoft-365.png
          href: http://your-microsoft-365-link-here
          description: Cloud productivity suite
      - SharePoint:
          icon: https://cdn.jsdelivr.net/gh/homarr-labs/dashboard-icons/png/microsoft-sharepoint.png
          href: http://your-sharepoint-link-here
          description: Document management & collaboration

  - Networking & Proxy:
      - Nginx Proxy Manager:
          icon: https://cdn.jsdelivr.net/gh/walkxcode/dashboard-icons/png/nginx-proxy-manager.png
          href: http://your-nginx-proxy-manager-link-here
          description: Reverse proxy & SSL management
Step 3: Save and Close the File
Save and close the file (in nano: press Ctrl + O, Enter to save, then Ctrl + X to exit).
Step 4: Reload the page or restart the container:
# make sure you're in the homepage directory
docker compose restart

Tools and services all neatly organised into categories.
4. Adding a Background Image
Homepage allows you to easily add a custom background image via the settings.yaml file. This is a great way to personalise your dashboard further. Follow these steps to add your background image:
Step 1: Locate the settings.yaml file:
cd ~/dashboard/homepage/config && nano settings.yaml
Step 2: Add the Background Image Setting:
background:
  image: https://images.unsplash.com/photo-1502790671504-542ad42d5189?auto=format&fit=crop&w=2560&q=80
You can also adjust filters (blur, brightness, saturation) to achieve the look you want. These settings are based on Tailwind CSS classes, so you can use the values described in the Tailwind CSS documentation.
P.S I’m no expert in this regard, just following the documentation 🙂
For more detailed information on background image settings, including filter options, check out the Homepage docs and Unsplash (make sure to copy the image URL when referencing it in your settings.yaml file):

Step 3: Save and Close the File
Step 4: Restart Homepage:
docker compose restart

Conclusion
Just as a tidy desk improves focus, an organised digital environment boosts productivity.
Don’t shy away from exploring more customisations, integrations, and features to truly tailor your dashboard to fit your needs. The possibilities are endless, and with Homepage, you have the control to make your workspace as productive and personalised as you want it to be.